

How To Add My Own Background In Dev C++
Warning: Starting with version 3.3, Theme Editor is no longer included with Android Studio.
Android Studio includes a visual assistant called Theme Editor that helps yous:
- Create and change themes for your app.
- Adjust themes for different resource classifiers.
- Visualize the effect of color changes on mutual UI elements.
This folio introduces the fundamental tasks that y'all can perform with the Theme Editor, and explains how to practice so.
Theme Editor nuts
This section describes how to access the Theme Editor, and how information technology is laid out.
Accessing the Theme Editor
There are two ways to open the Theme Editor:
- From an open styles XML file, such equally
styles.xml, click Open editor near the superlative-right of the file window. - From the Tools card, cull Theme Editor.
Navigating the Theme Editor
The Theme Editor'due south chief screen is divided into two sections. The left side of the editor shows what specific UI elements, such equally the app bar or a raised push, await like when you lot apply the current theme to them. The right side of the editor displays the name of the current theme being previewed, the module where the theme is defined, and the settings for theme resources, such as Theme parent and colorPrimary. You tin can modify design themes by changing these resource settings.
Themes and colors
The Theme Editor allows y'all to create new themes, modify existing ones, and manage the colors that brand up the themes.
Creating new themes
To create a theme, follow these steps:
- Open the Theme dropdown menu near the top of the right side of the Theme Editor.
- Click Create New Theme.
- In the New Theme dialog, enter a proper name for the new theme.
- In the Parent theme name list, click on the parent from which the theme inherits initial resources.
Renaming themes
To rename a theme, perform the following steps:
- Open the Theme dropdown menu near the acme of the right side of the Theme Editor.
- Click Rename theme-proper name .
- In the Rename dialog, enter a new name for the theme.
- (optional) To see how the changes will wait, click Preview.
- To apply the changes, click Refactor.
Changing color resource
To change an existing color resources, such as colorPrimary, follow these steps:
- In the Theme Editor, click the colored square next to the name of the resource you want to modify. The Resources dialog appears, which displays a listing of color groups on the left side, and settings and information for the currently selected resource colour on the correct.
- Set a color for the theme resource by either selecting a color from the left panel, or by defining a new color, every bit described below.
Select a color
The colors are listed in the left column of the Resources dialog and arranged into the following groups.
- Projection: These are colors inside your project. Some can be edited because they are part of your project sources, and some cannot be edited considering they are part of the libraries you have included in your project.
- android: These are color resource that belong to the android namespace. They are part of the Android framework and cannot exist edited.
- Theme Attributes: These are attributes of the currently selected theme. They are referenced by the theme and can change depending on what theme you have selected. Theme attributes are never editable from within the Resources dialog.
Ascertain a new color
- From the drib-down menu in the top-right of the Resources dialog, click Add new resource > New color Value. The Resource dialog displays an editable correct pane with a bare Name field so yous can enter a name for your custom color.
- Create the custom colour as follows. The steps correspond to the callouts in figure one.
- Type a name for your new color value in the empty Name field. No spaces or special characters allowed in the name. Underscores and numbers are okay.
- Color scale, Custom color field, and dropper:
- On the color calibration, click the color yous want. The color displays in the Custom colour field.
- You can use the dropper to the left of the Custom color field to select a color. Click the dropper
 , and so click something visible anywhere on your computer screen. The color in the Custom colour field changes to the color you selected.
- Just below the Custom colour field, utilise the editable fields and drop-down card on the left to specify an
RGB,HSB, orARGBcolor by numeric values. The HEX equivalent of your color displays in the editable field to the far right. - To fix the color opacity and hue, motility the sliders beneath the color scale.
- Select one of the bachelor predefined color squares. The color displays in the Custom Colour field and the name changes to the proper noun of the colour you selected.
- Click OK to save your settings. The Resources dialog closes and returns you to the Theme Editor.
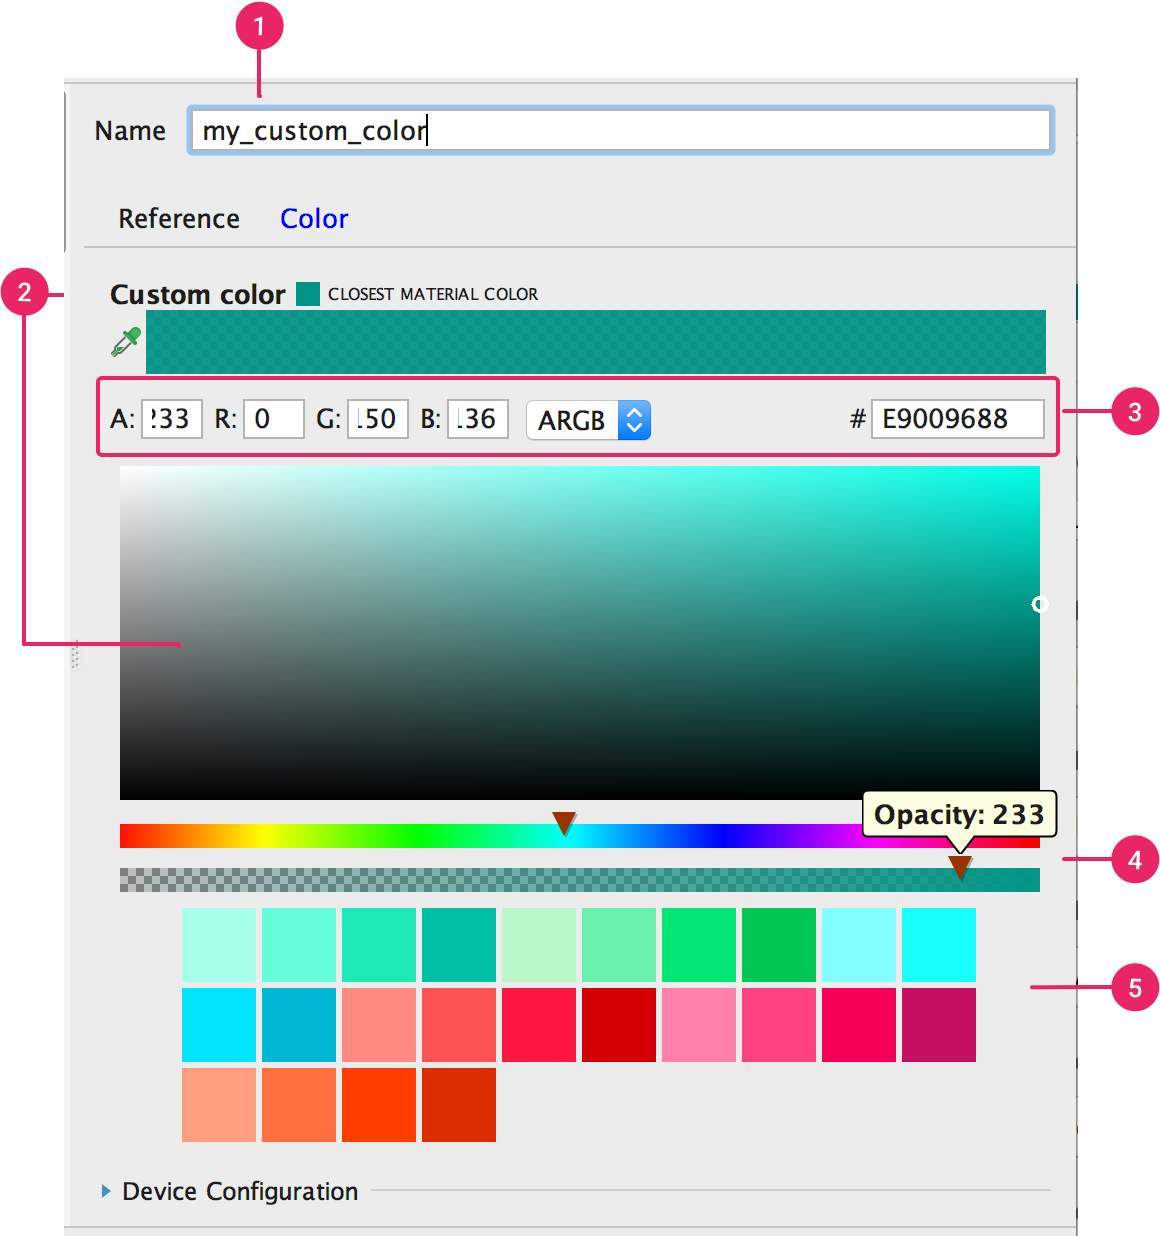
Figure 1. The Color editor
Modify a color
You tin modify any editable color. If a color is editable, you encounter editable color, hue, opacity, proper noun field, and device configuration fields. See Select Colour if you want to know why some fields are editable and others are not.
- Adjust the settings.
- Click OK.
Match material colour
If yous have defined or modified a custom project color, you tin can ensure that the colour matches the closest material palette colour by clicking CLOSEST MATERIAL COLOR, located next to Custom colour. Android Studio changes the color and opacity values of the color you lot picked to the textile colour nigh like it, and replaces Custom color with the proper noun of the colour from the material palette.
Note: The CLOSEST MATERIAL Color feature is visible only when the color is not already a fabric colour.
Viewing state lists and colors
The Theme Editor allows you to preview colors associated with different states. To practice then, open the Resources dialog by clicking on the color set square next to the proper noun of an editable country list resource. The Resources dialog displays a list of states, such as Selected, and the color value associated with the state. Click the color for a state to choose a unlike color value.
To more than fully command u.s. themselves, you can directly view and edit their properties in the XML file that defines them. For more than information, see the documentation for the ColorStateList class.
Device-specific configurations
When a color is editable, you can choose device-specific configurations for your app to back up. Perform the post-obit steps to do so:
- Open up the Resource dialog. For information about how to open the Resources dialog, meet Irresolute color resource.
- Select a Project color, and then in the lesser of the right pane, click to expand Device Configuration, revealing the source set and name of the XML file containing the resources, and a list of configuration-specific directories in which to identify that file.
- If necessary, modify the XML file name.
- Check the boxes next to the directories corresponding to the device-specific configurations you lot wish to support. Any configuration for which y'all practise not specify a directory defaults to using the
valuesdirectory.
For more information about the relationship between directory names and configurations, see Supporting Multiple Screens. For more data virtually supported directory names, come across Providing Resource.

How To Add My Own Background In Dev C++,
Source: https://developer.android.com/studio/write/theme-editor
Posted by: baumgartnerfortint.blogspot.com
0 Response to "How To Add My Own Background In Dev C++"
Post a Comment